
Android app development and Google Firebase
Google Firebase provides backend services that can really speed up app development. Here we look at setting up and running one of the sample applications (FriendlyPix) and see how Firebase can handle some of the difficult core functions, like user authentication and serving content.
There are a whole range of open-source tools and free training to help you get started building apps. Cross-platform development tools (such as Xamarin) are attractive and may well become the standard approach in future, but for now if you want a highly responsive user interface and tight integration with OS features, native application development is probably still the way to go. For my latest project, I’m going to be building in Android Studio using Java and XML. The equivalent for Apple iOS is Xcode, available from the Mac App Store.
The Udacity Developing Android Apps course is free and is written in conjunction with Google. Ideal for those with a bit of programming experience already. Also, there is the Firebase in a Weekend: Android for further study.
This tutorial will introduce getting the application code running in Android Studio 3.0, connecting to Google Firebase with user authentication using a Google account, and running the app on the local emulator or a connected phone.
1. Getting the sample application source code
The FriendlyPix code is available on github, and has separate repositories for each of the supported platforms (iOS, Android, web). If you’ve got Git installed, use the command line to navigate to (or create) a folder for your source code, and clone the repository. Here’s what I did:
> cd source_code
> git clone https://github.com/firebase/friendlypix-android.git
Open the project (folder) in Android Studio. At the time of writing (November 2017), I have just upgraded to Android Studio 3.0, but it looks like the FriendlyPix code is still designed around a previous version. Android Studio will prompt for a number of components to be updated, but should handle everything.
I also had to change a few things in the app build.gradle file. With Android Studio 3.0 there is a new requirement for product flavour dimensions. There also seemed to be a mis-match with the applicationId which needed changing: friendlypixtest should be friendlypix. These issues are likely to be updated at some point in the github repository, but here are the changes I made:
android {
	compileSdkVersion 23
	buildToolsVersion '26.0.2'
+	flavorDimensions "versionCode"

	defaultConfig {
		applicationId "com.google.firebase.samples.apps.friendlypix"
		minSdkVersion 17
		targetSdkVersion 23
		versionCode 3
		versionName "20160401.02"
	}
	signingConfigs {
		release {
			storeFile file("release.jks")
			storePassword "friendlypix"
			keyAlias "friendlypix"
			keyPassword "friendlypix"
		}
	}
	buildTypes {
		release {
			minifyEnabled false
			proguardFiles getDefaultProguardFile('proguard-android.txt'), 'proguard-rules.pro'
			signingConfig signingConfigs.release
		}
	}
	productFlavors {
		dev {
+			dimension "versionCode"
		}
		prod {
			applicationId "pub.devrel.friendlypix"
+			dimension "versionCode"
		}
		dev2 {
-			applicationId "com.google.firebase.samples.apps.friendlypixtest"
+			applicationId "com.google.firebase.samples.apps.friendlypix"
+			dimension "versionCode"
		}
	}
At this point, you may have warnings in Android Studio about a missing file: google-services.json. This is the Firebase configuration file that we will create and download in the next section.
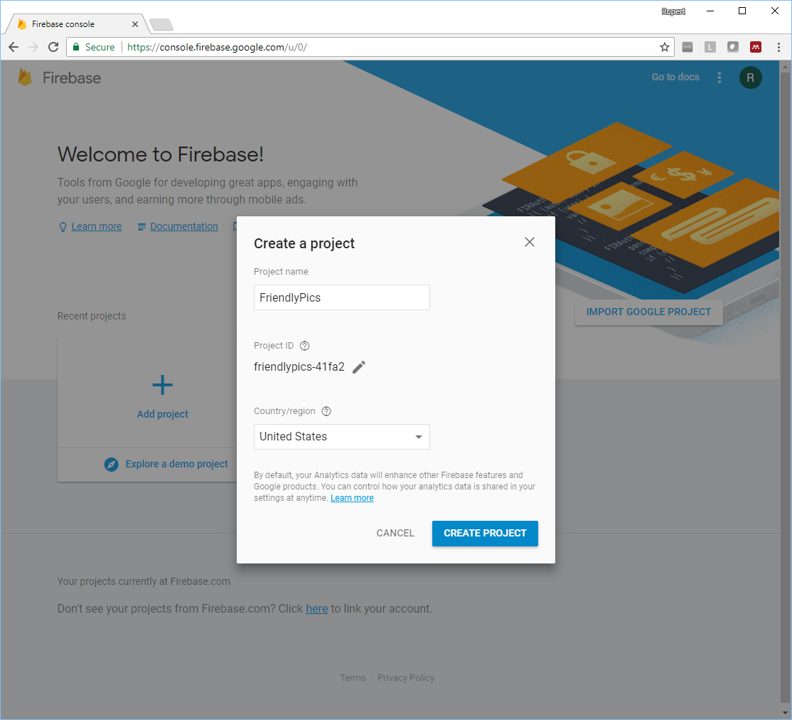
2. Setting up the project on Firebase
Go to the Firebase console, click ‘Add project’ and enter some details:
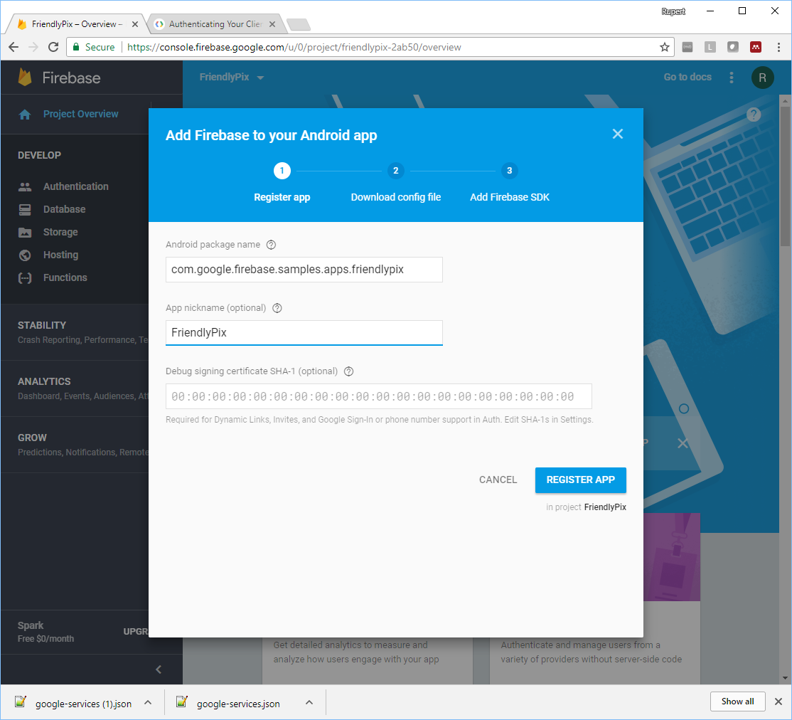
Then go to ‘Add Firebase to your Android app’, and enter the details for the app. You’ll need the Android package name - in this case we’ll use the default: com.google.firebase.samples.apps.friendlypix, but you can find/change it at the top of the AndroidManifest:
<manifest xmlns:android="http://schemas.android.com/apk/res/android"
package="com.google.firebase.samples.apps.friendlypix">
Give the app a nickname. You’ll also need the Debug Signing certificate, which is generated as part of your installation of Android Studio. (It says optional, but you’ll need it to enable user authentication with Google Sign-in). Full instructions on how to find it here.
For my Windows 10 install, the following was sufficient (default password is android):
> cd "\Program Files\Android\Android Studio\jre\bin"
> keytool -exportcert -list -v -alias androiddebugkey -keystore %USERPROFILE%\.android\debug.keystore

Enter keystore password:
Alias name: androiddebugkey
Creation date: 27-Oct-2017
Entry type: PrivateKeyEntry
Certificate chain length: 1
Certificate[1]:
Owner: C=US, O=Android, CN=Android Debug
Issuer: C=US, O=Android, CN=Android Debug
Serial number: 1
Valid from: Fri Oct 27 21:19:28 BST 2017 until: Sun Oct 20 21:19:28 BST 2047
Certificate fingerprints:
         MD5:  5B:74: .... *** ... :4A:5C
         SHA1: A1:5D: .... *** ... :8E:EA
         SHA256: E3:E7: .... *** ... :AE:10
         Signature algorithm name: SHA1withRSA
         Version: 1
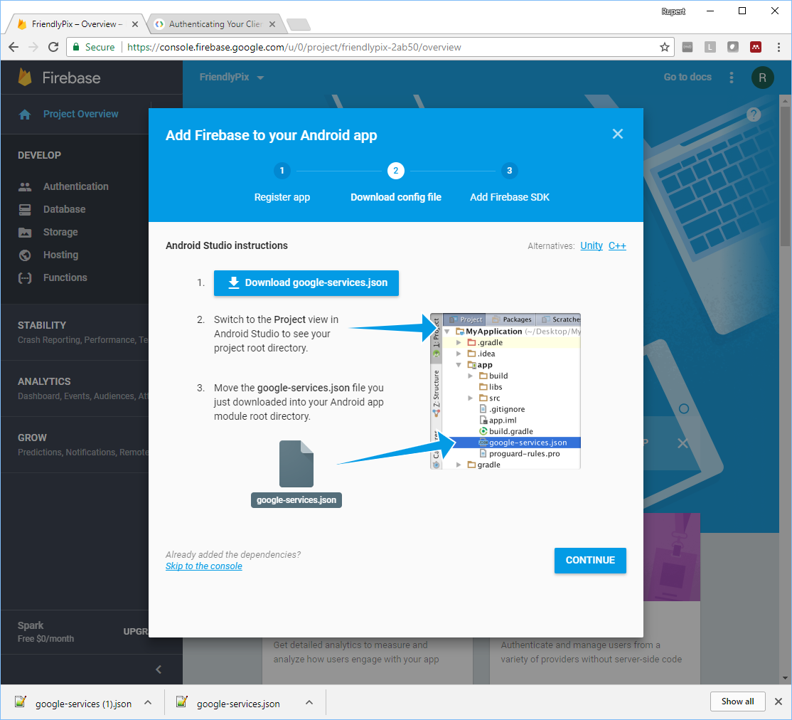
Copy the text after SHA1: into the dialog box on the Firebase console. Click continue, and download the google-services.json file, and place it into the friendlypix/app folder. The next window in the Firebase console will ask you to add some dependencies to the project in Android Studio - you shouldn’t need to do this as they will already be there.
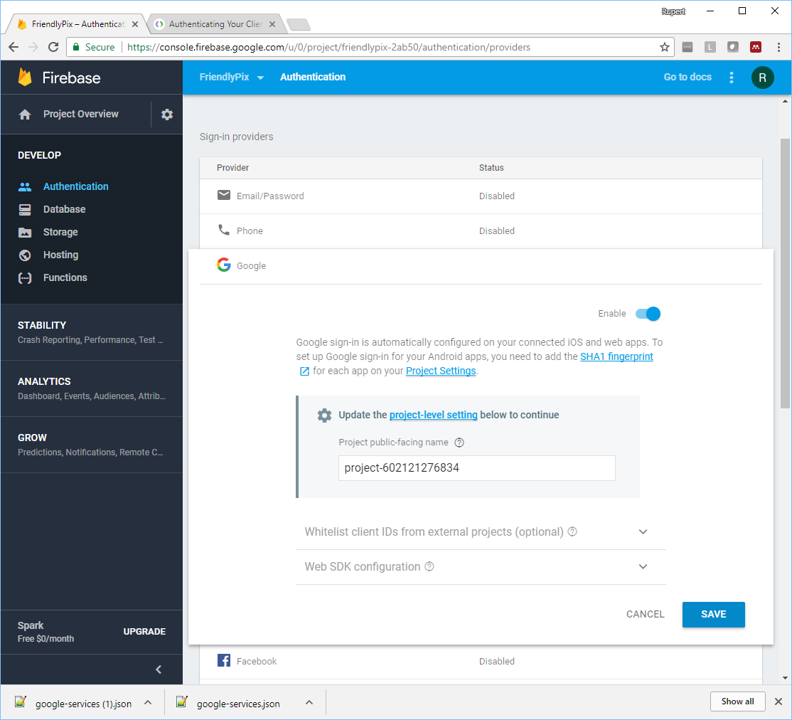
Next we’ll enable user authentication (login) using Google accounts. Click Authentication in the Firebase console menu, and then Set Up Sign-In Method, and choose Google (this is the easist to get up and running quickly - we’ll look at Facebook authentication another time), click ‘Enable’, update the project public name if you like, and then Save.
3. Building and running the app
After all that, you should be ready to build and run your app. Go back to Android Studio, build the project (CTRL+F9, or the green hammer in the toolbar)… took a couple of minutes on my laptop… and then click run. If you haven’t set up your emulator or test device yet, Android Studio will prompt you to do this now.
If all goes well, find the FriendlyPix app on your emulator/device and open it. You should now be able to log in with a Google account, and explore the app:

I couldn’t get all the features of the app working - there seems to be an issue with uploading a photograph (unfortunately a key requirement for a photo sharing app…), relating to resizing the image in a background thread. That is a problem for another day, however!